Golem
Intro
Golem is a complete test automation tool and framework for end-to-end testing. It creates powerful, robust and maintainable test suites, yet, it is easy to pick up and learn even without a lot of programming knowledge. It is based on Selenium Webdriver and it can be extended using Python.
It can:
- Use the Page Object pattern
- Write tests with multi data sets (data-driven)
- Run tests in parallel
- Test APIs
- Run tests remotely (Selenium Grid or a cloud testing provider)
- It can be executed from Jenkins or any other CI tool
It has:
- A complete GUI module (a web application) to write and execute tests
- A reporting engine and a web reports module
- An interactive console
Selenium
Some prior knowledge of Selenium is required to work with Golem. Golem extends Selenium webdriver and webelement classes and uses a simplified interface for finding elements. It is advised to understand how standard Selenium works. This guide is a good place to start.
Contents
Installation
Requirements
Python
Golem requires Python 3.6 or higher.
Windows:
The Windows installer works fine, you can get it from here: python.org/downloads/
Mac:
To install on Mac OS follow these instructions: Installing Python 3 on Mac OS X
Linux:
Debian 8 and Ubuntu 14.04 comes with Python 3.4 pre-installed, newer Linux distributions might come with newer Python versions.
Since Linux tends to have both Python 2 and 3 installed alongside each other, the command to execute the latter should be ‘python3’ instead of just ‘python’.
PIP
PIP is the package manager for Python. It is required to install Golem and its dependencies. Check if you already have it. PIP comes bundled with the newer versions of Python.
pip --version
or
pip3 --version
If you don’t have PIP installed, follow these instructions.
Create a Virtual Environment
It is recommended to install Golem and its dependencies in a virtual environment instead of globally. To do that, follow these steps:
Install Virtualenv
pip install virtualenv
Create a new virtualenv in the ‘./env’ folder
virtualenv env
If the virtual environment is being created with Python 2 instead of 3, use the following command instead:
virtualenv env -p python3
Activate the Environment
To use a virtual environment it needs to be activated first.
Windows:
env\scripts\activate
Mac/Linux:
source env/bin/activate
Install Golem Using PIP
The quickest and the preferred way to install Golem.
pip install golem-framework
Installing From Source
pip install -U https://github.com/golemhq/golem/archive/master.tar.gz
Tutorial - Part 1
Let’s create the first test in Golem and learn the main features along the way. This tutorial assumes Golem is already installed. If not, head over to the Installation section.
Create a Test Directory
A Test Directory needs to be created first. This directory contains the initial folder structure and some config files. To create a Test Directory, open a console wherever you want the new directory to be and execute this command:
golem-admin createdirectory <test_dir_name>
This will create a testdir folder that will be used for all subsequent projects.
Download Webdriver
Each browser requires its own Webdriver executable. Golem uses the webdriver-manager tool to download these automatically.
cd <test_directory>
webdriver-manager update
The Webdriver executables are downloaded into the drivers folder inside the Test Directory.
The settings.json file contains a key for each browser that should point to the Webdriver file for that browser. For example:
settings.json
{
    "chromedriver_path": "./drivers/chromedriver*"
}
The ‘*’ wildcard at the end of the path is used to match the highest version available, in the case there’s more than one present.
This doesn’t need to be modified unless the Webdriver files are located elsewhere.
For more detail, check this page.
Start the Web Module
To start the Golem Web Module, run the following command:
golem gui
The Web Module can be accessed at http://localhost:5000/
The following superuser is available at the start: username: admin / password: admin
Create a New Project
A new project can be created by using the Web Module or by the following command:
cd <directory_name>
golem createproject <project_name>
A new project has the following structure:
project_name/
    pages/
    reports/
    suites/
    tests/
    environments.json
    settings.json
Once the test directory and the project are created you can proceed to Tutorial - Part 2
Tutorial - Part 2
Adding a New Test File
Test files are Python modules located inside the tests folder of a project.
To create a new test file use the following command:
golem createtest <project_name> <test_name>
A test can also be created from the Web Module.
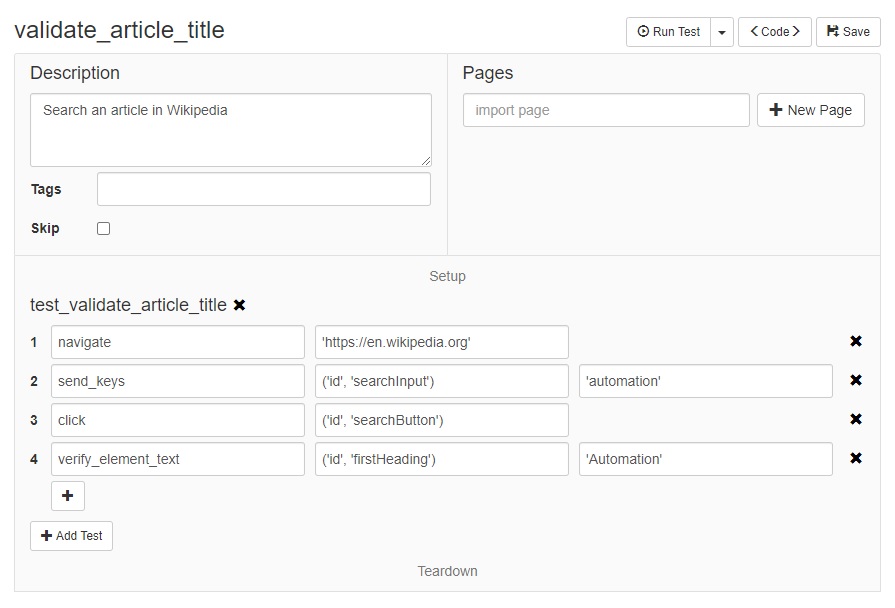
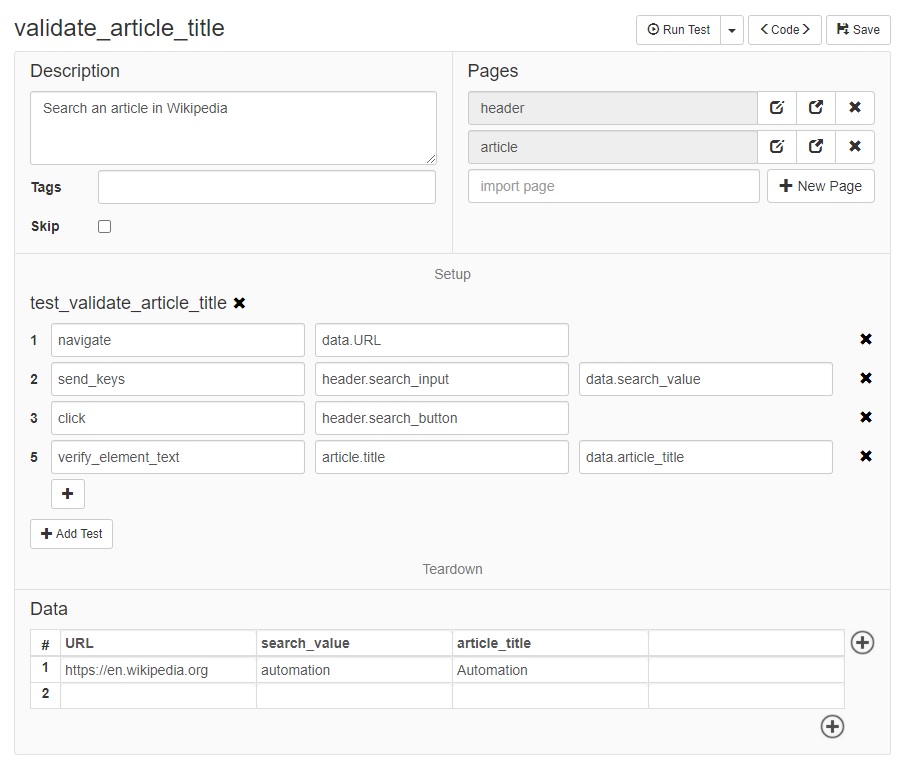
A test example
Next is a test that navigates to ‘en.wikipedia.org’, searches an article and validates that the title of the article is correct.
validate_article_title.py
description = 'Search an article in Wikipedia'

def test_validate_article_title(data):
    navigate('http://en.wikipedia.org/')
    send_keys(('id', 'searchInput'), 'automation')
    click(('id', 'searchButton'))
    verify_element_text(('id', 'firstHeading'), 'Automation')
In the Web Module:
Golem Actions
In the previous example, navigate, send_keys, click, and verify_element_text are Golem actions. Check out the entire list of actions.
Opening and Closing the Browser
There is no need to open or close the browser. The first action that requires a browser will open one. At the end, Golem will close the browser. However, this can be done explicitly with the open_browser and close_browser actions.
Running a Test
To run the test just press the ‘Run Test’ button in the Web Module or run the following command:
golem run <project_name> validate_article_title
Managing Test Data
The data for each test can be stored inside the test file, in CSV or JSON files.
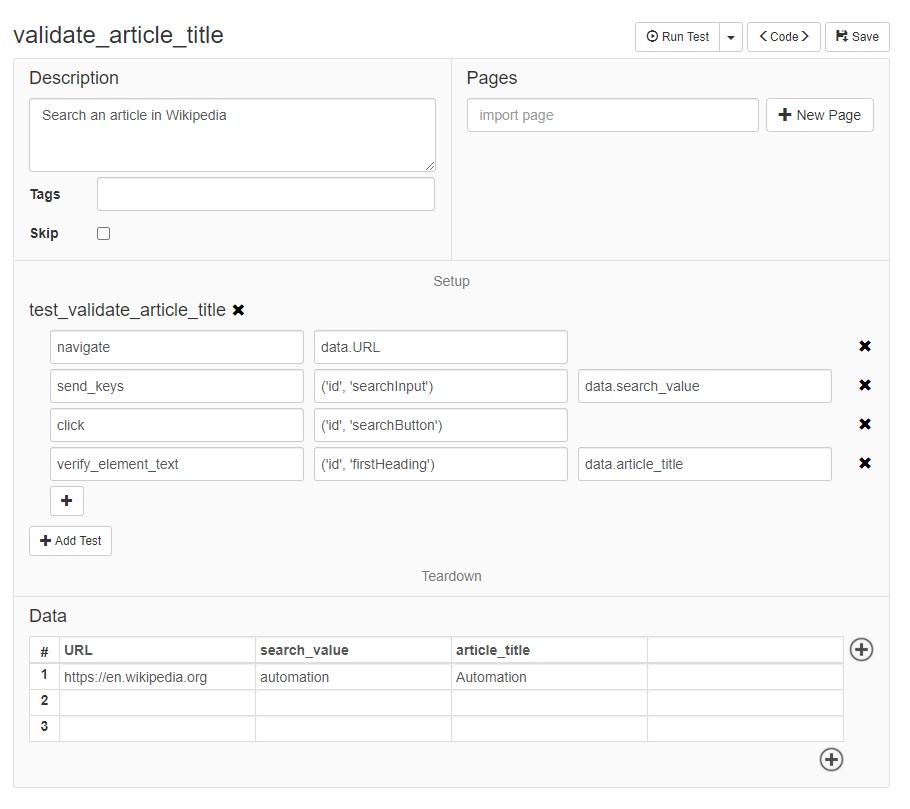
Using the CSV Data Table
Let’s rewrite the previous test but extracting all the data outside the code:
In the Test Builder select Add Data Source -> CSV. Then we fill the table with the following values:
validate_article_title.csv
URL,search_value,article_title
http://en.wikipedia.org/,automation,Automation
And we refactor the test to use the data object instead of hardcoded values:
validate_article_title.py
description = 'Search an article in Wikipedia'

def test_validate_article_title(data):
    go_to(data.URL)
    send_keys(('id', 'searchInput'), data.search_value)
    click(('id', 'searchButton'))
    verify_element_text(('id', 'firstHeading'), data.article_title)
This is the final result:
Multiple data sets
The test will be executed once per each row in the CSV file. Each row is considered a data set.
For example, consider the previous data file, but with more rows:
validate_article_title.csv
URL,search_value,article_title
http://en.wikipedia.org/,automation,Automation
http://en.wikipedia.org/,webdriver,Selenium (software)
http://es.wikipedia.org/,chimichanga,Chimichanga
http://fr.wikipedia.org/,soupe à l'oignon,Soupe à l'oignon
Using this data file, Golem will run the same test 4 times, using each time a different data set.
Using Page Objects
If you remember from the previous example, each time the test interacted with a web element (an HTML tag), the selector for that element was defined right there inside the step. That will make the tests hard to maintain, especially when the application under test changes.
Defining Page Objects
It is a good practice to keep the selectors of the web elements outside of the test, and declared once in a single place. That place should be a Page Object.
A Page Object represents an entire page of the application (or a part of a page, like the header or the menu). Inside the Page Object, the elements of the page can be defined so they can be used later in the tests.
Let’s see an example. Consider the previous test (validate_article_title). Let’s extract all the element selectors and put them inside Page Objects.
For this, we create two pages. The first will be the ‘header’, as it’s the same header for every page of the application. The second page object will be the ‘article’.
header.py
search_input = ('id', 'searchInput')

search_button = ('id', 'searchButton')
article.py
title = ('id', 'firstHeading')
These pages, as seen with the Web Module, look like this:
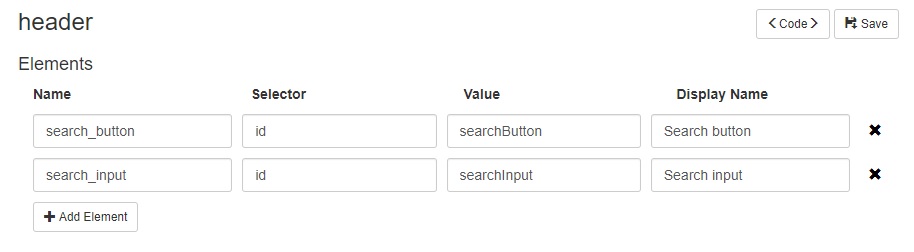
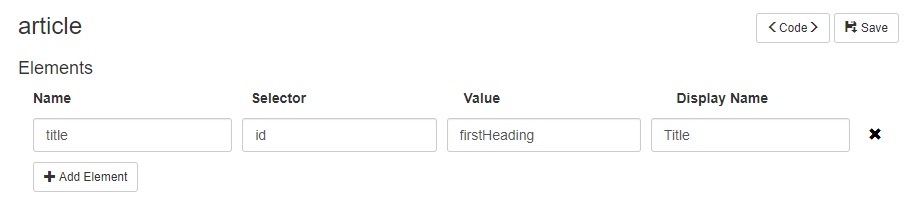
Using Pages Inside Tests
Having these two pages created, we can use them in our test, and refactor it as follows:
validate_article_title.py
description = 'Search an article in Wikipedia'

pages = ['header', 'article']

def test_validate_article_title(data):
    navigate(data.URL)
    send_keys(header.search_input, data.search_value)
    click(header.search_button)
    verify_element_text(article.title, data.article_title)
In the Web Module:
With this change, the ‘Search input’, ‘Search button’ and ‘Article Title’ elements are defined in a separate file. A test that needs to interact with these elements, just needs to import the page object and reference them. This reduces the required time to write new tests and the maintenance of existing tests.
Creating a suite
A suite lets you arbitrarily select a subset of all the tests to execute as a group.
A suite contains a list of tests, browsers, environments, tags, and the number of processes. Consider the following example:
full_regression.py
browsers = ['chrome', 'firefox']

environments = ['staging']

processes = 3

tags = []

tests = [
    'module.module_test1',
    'module.module_test2',
    'another_test',
    'validate_article_title'
]
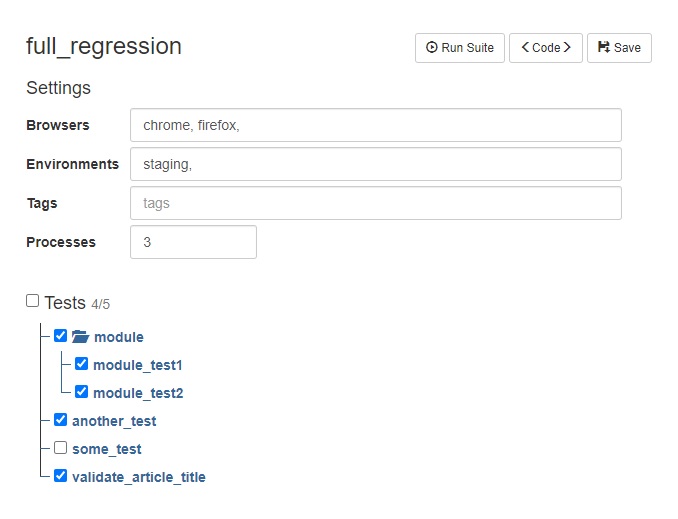
Note
This suite will execute all marked tests, once per each browser, environment and test set
Test Parallelization
The processes = 2 tells Golem how many tests should be executed at the same time. The default is one (one at a time).
How many tests can be parallelized depends on your test infrastructure.
Execution report
When the suite finishes a JSON report is generated in the reports folder. This report can be visualized using the Web Module.
That’s it! The basic tutorial ends here. Feel free to learn more about Golem using the table of contents. Happy testing!
Browsers
Supported Browsers
The supported browsers are:
- Chrome
- Edge
- Firefox
- Internet Explorer
- Opera
- Remote (Selenium Grid)
Webdriver Manager
To download the Webdriver executables run the following command (currently only Chrome and Firefox):
webdriver-manager update
List the current downloaded versions:
webdriver-manager versions
Download a specific Webdriver:
webdriver-manager update -d chrome
To learn more about the Webdriver Manager see: https://github.com/golemhq/webdriver-manager
Webdriver Executables
Each browser requires its own Webdriver executable. These can be downloaded manually from these locations:
- Chrome: https://sites.google.com/a/chromium.org/chromedriver/downloads
- Firefox: https://github.com/mozilla/geckodriver/releases
- IE: http://selenium-release.storage.googleapis.com/index.html
- Edge: https://developer.microsoft.com/en-us/microsoft-edge/tools/webdriver/
- Opera: https://github.com/operasoftware/operachromiumdriver/releases
Path to the Webdriver Executables
Golem needs to know where to find the executables for each of the required browsers. This is accomplished by the settings.json file. By default it points to the drivers folder inside the Test Directory:
{
  "chromedriver_path": "./drivers/chromedriver*",
  "edgedriver_path": "./drivers/edgedriver*",
  "geckodriver_path": "./drivers/geckodriver*",
  "iedriver_path": "./drivers/iedriver*",
  "operadriver_path": "./drivers/operadriver*"
}
When using a search pattern like: "chromedriver_path": "./drivers/chromedriver*" Golem will automatically choose the highest version available.
In the next case, chromedriver_2.38 will be selected:
/drivers
    chromedriver_2.36
    chromedriver_2.37
    chromedriver_2.38
Error: cannot find Opera binary
The Opera driver fails to find the Opera binary installed in the machine. To fix this set the opera_binary_path setting to point to the Opera binary. Example:
"opera_binary_path": "C:\\Program Files\\Opera\\launcher.exe",
Specifying the Browser For a Test
The browser (or browsers) that a test or suite will use can be specified from a few places:
From the run command:
golem run project_name test_name -b chrome firefox
From a suite:
browsers = ['chrome', 'firefox']
Using the default_browser setting:
"default_browser": "chrome"
Valid options:
- chrome
- chrome-headless
- chrome-remote
- chrome-remote-headless
- edge
- edge-remote
- firefox
- firefox-headless
- firefox-remote
- firefox-remote-headless
- ie
- ie-remote
- opera
- opera-remote
- any remote browser defined in settings
Chrome Headless
Chrome can run in headless mode (without a GUI). Set the browser of a test or suite to ‘chrome-headless’ or ‘chrome-remote-headless’.
Requirements: chrome 58+, chromedriver 2.32+
golem run <project> <test> -b chrome-headless
Firefox Headless
Chrome can run in headless mode (without a GUI). Set the browser of a test or suite to ‘firefox-headless’ or ‘firefox-remote-headless’.
golem run <project> <test> -b firefox-headless
Working with the Browser
Opening and Closing the Browser
There is no need to open or close the browser. The first action that requires a browser will open one. At the end of the test, Golem will close the browser. However, this can be done explicitly with the open_browser and close_browser actions.
Retrieving the Open Browser
During the execution of a test the open browser is located in the execution module:
from golem import execution

print(execution.browser.title)
A shortcut to this is using the get_browser action:
from golem import actions

print(actions.get_browser().title)
Custom Browser Boot Up
To have full control over the configuration of a WebDriver instance a custom browser boot up function can be defined.
Custom browsers are defined inside a browsers.py module in the folder of a project.
Custom browser functions receive the settings dictionary and must return an instance of a GolemXDriver class (golem.webdriver.GolemChromeDriver, golem.webdriver.GolemGeckoDriver, golem.webdriver.GolemRemoteDriver, etc.)
projects/my_project/browsers.py
from selenium import webdriver
from golem.webdriver import GolemChromeDriver

def my_custom_chrome(settings):
    chrome_options = webdriver.ChromeOptions()
    chrome_options.add_argument("--window-size=800,600")
    executable_path = 'path/to/chromedriver'
    return GolemChromeDriver(executable_path=executable_path,
                             chrome_options=chrome_options)
Then use it:
golem run my_project . -b my_custom_chrome
The following custom browser uses the version matching mechanism to get the latest executable from the /drivers folder:
from selenium import webdriver
from golem.core.utils import match_latest_executable_path
from golem import execution
from golem.webdriver import GolemChromeDriver

def my_custom_chrome(settings):
    executable_path = settings['chromedriver_path']
    matched_executable_path = match_latest_executable_path(executable_path,
                                                           execution.testdir)
    return GolemChromeDriver(executable_path=matched_executable_path,
                             chrome_options=chrome_options)
A custom Firefox:
from selenium.webdriver.firefox.options import Options
from golem.core.utils import match_latest_executable_path
from golem import execution
from golem.webdriver import GolemGeckoDriver

def my_custom_firefox(settings):
    executable_path = settings['geckodriver_path']
    matched_executable_path = match_latest_executable_path(executable_path,
                                                           execution.testdir)
    options = Options()
    options.add_argument("--headless")
    return GolemGeckoDriver(executable_path=matched_executable_path, options=options)
A custom remote browser
from golem.webdriver import GolemRemoteDriver

def my_custom_remote_driver(settings):
    capabilities = {
        'browserName': 'chrome',
        'platform': 'WINDOWS',
        'version': ''
    }
    grid_url = 'http://localhost:4444'
    return GolemRemoteDriver(command_executor=grid_url,
                             desired_capabilities=capabilities)
Finding Elements
Actions and Elements
Golem actions that require a WebElement can be defined in four different ways:
An element tuple:
from golem import actions

input = ('id', 'myElementId', 'Username input')
actions.send_keys(input, 'my username')

# the third element is optional
button = ('css', 'button.btn-default')
actions.click(button)
A css selector string:
from golem import actions

actions.send_keys('#myElementId', 'my username')
actions.click('button.btn-default')
An XPath selector string:
from golem import actions

actions.send_keys('//input[@id="myElementId"]', 'my username')
actions.click('//button[@class="btn-default"]')
A WebElement object:
from golem import actions

webelement = actions.get_browser().find(id='myElementId')
actions.send_keys(webelement, 'my username')

webelement = actions.get_browser().find(css='button.btn-default')
actions.click(webelement)
find and find_all
The browser has two methods used to find elements: find and find_all
find()
GolemExtendedDriver.find(element=None, id=None, name=None, link_text=None, partial_link_text=None, css=None, xpath=None, tag_name=None, timeout=None, wait_displayed=None)
The find() method provides a few ways to find elements. Only one search criteria must be provided. element must be a CSS selector string, an XPath selector string, an element tuple, or a WebElement object.
The timeout argument determines how much time to wait until the element is present. If this is not provided, the value defined in settings by the search_timeout key will be used. This is considered the global search timeout.
The wait_displayed argument makes find() wait for the element to be displayed (visible) as well. This value is taken by default from the wait_displayed key in settings.
Some examples:
from golem import actions


browser = actions.get_browser()

# by an element tuple
element = browser.find(('id', 'someId'))

# by a css selector (positional argument)
element = browser.find('input.someClass')

# by an XPath selector (positional argument)
element = browser.find('//input[@class="someClass"]')

# by a WebElement object
element = browser.find(id='someId')
element = browser.find(element)

# by css selector (keyword argument)
element = browser.find(css='input.someClass')

# by id
element = browser.find(id='someId')

# by name
element = browser.find(name='someName')

# by link text
element = browser.find(link_text='link text')

# by partial link text
element = browser.find(partial_link_text='link')

# by xpath (keyword argument)
element = browser.find(xpath="//input[@id='someId']")

# by tag name
element = browser.find(tag_name='input')
find_all()
GolemExtendedDriver.find_all(element=None, id=None, name=None, link_text=None, partial_link_text=None, css=None, xpath=None, tag_name=None)
Finds all the elements that match the selected criteria. Only one search criteria must be provided. Returns a list of WebElements. element must be a CSS selector string, an XPath selector string, an element tuple, or a WebElement object.
from golem import actions

browser = actions.get_browser()
table_rows = browser.find_all('table.myTable > tbody > tr')
Finding children elements
WebElements also have the find() and find_all() methods. They can be used to find children elements from a parent element.
from golem import actions

browser = actions.get_browser()

table_rows = browser.find('table.myTable').find_all('tr')

for row in table_rows:
    print(row.find('td.resultColumn').text)
element() and elements() Shortcuts
element() and elements() provide handy shortcuts to find() and find_all() respectively.
from golem.browser import element, elements


title = element(id='headerTitle')
print(title.text)

table_rows = elements('table > tbody > tr')
print(len(table_rows))
Waiting for Elements
Implicit Wait
There is an implicit search timeout that is applied to every time a web element is searched. This search timeout is defined in the settings file by using the search_timeout setting key.
It can also be set by using the set_search_timeout and get_search_timeout actions.
Note that this timeout only waits for the element to be present (to exist in the DOM). It does not wait for the element to be visible, clickable, enabled, etc.
Explicit Wait
There are a few ways to wait for an element to be present.
Using the wait_for_element_present action:
from golem import actions

actions.wait_for_element_present('#button-id', 15)
actions.click('#button-id')
Using the timeout argument in the find methods:
from golem import actions

button = actions.get_browser().find('#button-id', timeout=15)
button.click()
Using the wait_for_element_present method of the WebDriver class:
from golem import actions

actions.get_browser().wait_for_element_present('#button-id', timeout=15)
Wait for Element Displayed
Very often an element needs to be displayed (visible) besides being present. Here are the ways to wait for an element to be visible.
Using the wait_displayed setting. This is defined globally for every search.
Using the wait_for_element_displayed action.
Using the wait_displayed argument in the find methods:
from golem import actions

actions.get_browser().find('#button-id', 15, wait_displayed=True).click()
Using the wait_displayed method of the WebElement class:
from golem import actions

button = actions.get_browser().find('#button-id')
button.wait_displayed().click()
Golem Actions
Golem has a list of predefined actions that cover most of the scenarios for tests. These are self-documenting, meaning, they store the steps, logs and screenshots in the execution report.
Location: golem.actions
A note on assertions and verifications:
Actions that start with ‘assert_’ are hard assertions. They will stop the test when they fail (jump to teardown) and the test will end with result: failure.
Actions that start with ‘verify_’ are soft assertions. When a verify_ action fails it stores an error but the test continues with the next statement. The test will end with result: error.
Alerts
accept_alert(ignore_not_present=False)
Accept an alert, confirm or prompt box. Use ignore_not_present to ignore error when alert is not present.
assert_alert_not_present()
Assert an alert is not present. This applies to alerts, confirms and prompts.
assert_alert_present()
Assert an alert is present. This applies to alerts, confirms and prompts.
assert_alert_text(text)
Assert alert text. This will fail if there is no alert present.
assert_alert_text_is_not(text)
Assert alert text is not text. This will fail if there is no alert present.
dismiss_alert(ignore_not_present=False)
Dismiss an alert, confirm or prompt box. When ignore_not_present is True the error when alert is not present is ignored.
get_alert_text()
Get text of alert, confirm or prompt box
send_text_to_alert(text)
Send text to an alert
submit_prompt_alert(text)
Send text to a prompt alert and accept it. If there is no prompt alert present this will fail.
verify_alert_not_present()
Verify an alert is not present. This applies to alerts, confirms and prompts.
verify_alert_present()
Verify an alert is present. This applies to alerts, confirms and prompts.
verify_alert_text(text)
Verify alert text. This will fail if there is no alert present.
verify_alert_text_is_not(text)
Verify alert text is not text. This will fail if there is no alert present.
wait_for_alert_present(timeout=30)
Wait for an alert to be present
API
assert_response_status_code(response, status_code)
assert response status code
http_get(url, headers={}, params={})
Perform an HTTP GET request to the URL, with the given headers and params. Headers and params must be Python dictionaries and are optional. The response is stored in ‘data.last_response’. Returns the response.
Example:
http_get('http://google.com/')
assert data.last_response.status_code == 200
http_post(url, headers={}, data={}, verify_ssl_cert=True)
Perform an HTTP POST request to the URL, with the given headers and data. Headers and params must be Python dictionaries and are optional. The response is stored in ‘data.last_response’ Returns the response.
verify_response_status_code(response, status_code)
Verify response status code
Browser
activate_browser(browser_id)
Activates a browser to use in subsequent actions. When opening more than one browser (not windows or tabs) for a single test, the new browser can be assigned to an ID. Default browser ID is ‘main’.
close_browser()
Closes the webdriver browser and all it’s windows/tabs
get_browser()
Returns the active browser driver object
get_window_size()
Return the window size with the following format:
size = {
    'width': x,
    'height': y
}
maximize_window()
open_browser(browser_name=None, capabilities=None, remote_url=None, browser_id=None)
Open a new browser.
See open_browser
set_window_size(width, height)
Set the width and height of the window (in pixels)
Cookies
add_cookie(cookie_dict)
Add a cookie to the current session.
Required keys are: “name” and “value”. Optional keys are: “path”, “domain”, “secure”, “expiry”
Note:
- If a cookie with the same name exists, it will be overridden.
- This function cannot set the domain of a cookie, the domain URL must be visited by the browser first.
- The domain is set automatically to the current domain the browser is in.
- If the browser did not visit any URL (initial blank page) this function will fail with “Message: unable to set cookie”
Example usage:
add_cookie({’name’: ‘foo’, ‘value’: ‘bar’})
assert_cookie_present(name)
Assert a cookie exists in the current session by the cookie name
assert_cookie_value(name, value)
Assert the value of a cookie. This will fail if the cookie does not exist.
delete_all_cookies()
Delete all cookies from the current session. Note: this only deletes cookies from the current domain.
delete_cookie(name)
Delete a cookie from the current session.
get_cookie(name)
Get a cookie by its name. Returns the cookie if found, None if not.
get_cookies()
Returns a list of dictionaries, corresponding to cookies present in the current session.
verify_cookie_present(name)
Verify a cookie exists in the current session by the cookie name
verify_cookie_value(name, value)
Verify the value of a cookie. This will fail if the cookie does not exist.
Element
assert_element_attribute(element, attribute, value)
Assert value of element attribute
assert_element_attribute_is_not(element, attribute, value)
Assert the value of attribute of element is not ‘value’
assert_element_checked(element)
Assert element is checked. This applies to checkboxes and radio buttons.
assert_element_displayed(element)
Assert element is displayed (visible to the user)
assert_element_enabled(element)
Assert that element is enabled
assert_element_has_attribute(element, attribute)
Assert element has attribute
assert_element_has_focus(element)
Assert element has focus
assert_element_has_not_attribute(element, attribute)
Assert element does not have attribute
assert_element_has_not_focus(element)
Assert element does not have focus
assert_element_not_checked(element)
Assert element is not checked. This applies to checkboxes and radio buttons.
assert_element_not_displayed(element)
Assert element is not displayed (visible to the user)
assert_element_not_enabled(element)
Assert that element is not enabled
assert_element_not_present(element)
Assert element is not present in the DOM
assert_element_present(element)
Assert element is present in the DOM
assert_element_text(element, text)
Assert the text of the element
assert_element_text_contains(element, text)
Assert element contains text
assert_element_text_is_not(element, text)
Assert the text of the element is not text
assert_element_text_not_contains(element, text)
Assert element does not contain text
assert_element_value(element, value)
Assert element value
assert_element_value_is_not(element, value)
Assert element value is not value
check_element(element)
Check an element (checkbox or radiobutton). If element is already checked this is is ignored.
clear_element(element)
Clear element (e.g. a text input)
click(element)
Perform a mouse click on element
double_click(element)
Perform a double click on element
focus_element(element)
Give focus to element
get_element_attribute(element, attribute)
Get the attribute value of element. If the attribute is not present in element, None is returned.
get_element_text(element)
Get the element text
get_element_value(element)
Get the element value attribute
highlight_element(element)
Highlight element on the page
javascript_click(element)
Click an element using Javascript
mouse_over(element)
Perform a mouse over on the element
press_key(element, key)
Press a given key in the element. Key must be a string with a value defined in selenium.webdriver.common.keys.Keys
Examples:
press_key('ENTER')
press_key('TAB')
press_key('LEFT')
send_secure_keys(element, text)
Send keys to element. Text is hidden from logs and report (masked by asterisks).
send_keys(element, text)
Send text to element
send_keys_with_delay(element, text, delay=0.1)
Send keys to element one by one with a delay between keys. Delay must be a positive int or float.
submit_form(element)
Submit form. Element can be the form itself or any child element.
uncheck_element(checkbox)
Uncheck a checkbox. If element is already checked this is is ignored.
verify_element_attribute(element, attribute, value)
Verify the value of attribute of element
verify_element_attribute_is_not(element, attribute, value)
Verify the value of attribute of element is not value
verify_element_checked(element)
Verify element is checked. This applies to checkboxes and radio buttons.
verify_element_displayed(element)
Verify element is displayed (visible to the user)
verify_element_enabled(element)
Verify that element is enabled
verify_element_has_attribute(element, attribute)
Verify element has attribute
verify_element_has_focus(element)
Verify element has focus
verify_element_has_not_attribute(element, attribute)
Verify element does not have attribute
verify_element_has_not_focus(element)
Verify element does not have focus
verify_element_not_checked(element)
Verify element is not checked. This applies to checkboxes and radio buttons.
verify_element_not_displayed(element)
Verify element is not displayed (visible to the user)
verify_element_not_enabled(element)
Verify that element is not enabled
verify_element_not_present(element)
Verify element is not present in the DOM
verify_element_present(element)
Verify element is present in the DOM
verify_element_text(element, text)
Verify the text of the element
verify_element_text_contains(element, text)
Verify element contains text
verify_element_text_is_not(element, text)
Verify the text of the element is not text
verify_element_text_not_contains(element, text)
Verify element does not contain text
verify_element_value(element, value)
Verify element value
verify_element_value_is_not(element, value)
Verify element value is not value
wait_for_element_displayed(element, timeout=30)
Wait for element to be present and displayed
wait_for_element_enabled(element, timeout=30)
Wait for element to be enabled
wait_for_element_has_attribute(element, attribute timeout=30)
Wait for element to have attribute
wait_for_element_has_not_attribute(element, attribute timeout=30)
Wait for element to not have attribute
wait_for_element_not_displayed(element, timeout=30)
Wait for element to be not displayed. When element is not displayed this is ignored. When element is not present this will raise ElementNotFound.
wait_for_element_not_enabled(element, timeout=30)
Wait for element to be not enabled
wait_for_element_not_present(element, timeout=30)
Wait for element to stop being present in the DOM. If element is already not present, this will be ignored.
wait_for_element_present(element, timeout=30)
Wait for element to be present in the DOM
wait_for_element_text(element, text, timeout=30)
Wait for element text to match given text
wait_for_element_text_contains(element, text, timeout=30)
Wait for element text to contain given text
wait_for_element_text_is_not(element, text, timeout=30)
Wait for element text to not match given text
wait_for_element_text_not_contains(element, text, timeout=30)
Wait for element text to not contain given text
Frames
switch_to_default_content()
Switch to default content (default frame)
switch_to_frame(frame)
Switch to frame. frame must be the index, name, or the frame webelement itself.
switch_to_parent_frame()
Switch to the parent of the current frame
Select
assert_selected_option_by_text(element, text)
Assert the option selected in a <select> by the option text
assert_selected_option_by_value(element, text)
Assert the option selected in a <select> by the option value
select_option_by_index(element, text)
Select an option from a <select> element by index (starts from 0)
select_option_by_text(element, text)
Select an option from a <select> element by the option text
select_option_by_value(element, value)
Select an option from a <select> element by the option value.
For example, given:
<select id="countrySelect">
    <option value="CA">Canada</option>
    <option value="US">United States</option>
    <option value="MX">Mexico</option>
</select>
To select the first option use:
select_option_by_index('#countrySelect', 0)
select_option_by_text('#countrySelect', 'Canada')
select_option_by_value('#countrySelect', 'CA')
verify_selected_option_by_text(element, text)
Verify the option selected in a <select> by the option text
verify_selected_option_by_value(element, text)
Verify the option selected in a <select> by the option value
Window
assert_page_contains_text(text)
Assert the given text is present anywhere in the page (in the entire DOM)
assert_page_not_contains_text(text)
Assert the given text is present anywhere in the page (in the entire DOM)
assert_title(title)
Assert the page title
assert_title_contains(partial_title)
Assert the page title contains partial_title
assert_title_is_not(title)
Assert the page title is not title
assert_title_not_contains(text)
Assert the page title does not contain text
assert_url(url)
Assert the current URL
assert_url_contains(partial_url)
Assert the current URL contains partial_url
assert_url_is_not(url)
Assert the current URL is not url
assert_url_not_contains(partial_url)
Assert the current URL does not contain partial_url
execute_javascript(script, *args)
Execute javascript code
Examples:
from golem import actions

# return the title of the page
title = actions.execute_javascript('return document.title')

# pass an element and click it using Javascript
element = actions.get_browser().find('#myElement')
actions.execute_javascript('arguments[0].click()', element)
get(url)
Navigate to a URL, same as navigate(url)
get_active_element()
Returns the element with focus, or BODY if nothing has focus
get_current_url()
Returns the current browser URL
get_page_source()
Get the entire source code of the page
get_window_title()
go_back()
Goes one step backward in the browser history
go_forward()
Goes one step forward in the browser history
refresh_page()
Refreshes the page
verify_page_contains_text(text)
Verify the given text is present anywhere in the page (in the entire DOM)
verify_page_not_contains_text(text)
Verify the given text is present anywhere in the page (in the entire DOM)
verify_title(title)
Verify the page title
verify_title_contains(partial_title)
Verify the page title contains partial_title
verify_title_is_not(title)
Verify the page title is not title
verify_title_not_contains(text)
Verify the page title does not contain text
verify_url(url)
Verify the current URL
verify_url_contains(partial_url)
Verify the current URL contains partial_url
verify_url_is_not(url)
Verify the current URL is not url
verify_url_not_contains(partial_url)
Verify the current URL does not contain partial_url
wait_for_page_contains_text(text, timeout=30)
Wait for page to contain text in the DOM
wait_for_page_not_contains_text(text, timeout=30)
Wait for page to not contain text in the DOM
wait_for_title(title, timeout=30)
Wait for page title to be the given value
wait_for_title_contains(partial_title, timeout=30)
Wait for page title to contain partial_title
wait_for_title_is_not(title, timeout=30)
Wait for page title to not be the given value
wait_for_title_not_contains(partial_title, timeout=30)
Wait for page title to not contain partial_title
Windows / Tabs
assert_amount_of_windows(amount)
Assert the amount of open windows/tabs
assert_window_present_by_partial_title(title)
Assert there is a window/tab present by partial title
assert_window_present_by_partial_url(partial_url)
Assert there is a window/tab present by partial URL
assert_window_present_by_title(title)
Assert there is a window/tab present by title
assert_window_present_by_url(url)
Assert there is a window/tab present by URL
close_window()
Close current window/tab. If there is only one window, this will close the browser, use close_browser instead. If there are other windows open, this will switch to the first window afterwards.
close_window_by_index()
Close window/tab by index. Note: “The order in which the window handles are returned is arbitrary.”
close_window_by_partial_title(partial_title)
Close window/tab by partial title
close_window_by_partial_url(partial_url)
Close window/tab by partial URL
close_window_by_title(title)
Close window/tab by title
close_window_by_url(url)
Close window/tab by URL
get_window_handle()
get_window_handles()
Return a list with the handles of all the open windows/tabs
get_window_index()
Get the index of the current window/tab from the list of window handles
get_window_titles()
Return a list with the titles of all the open windows/tabs
switch_to_first_window()
Switch to first window/tab (in the list of window handles)
switch_to_last_window()
Switch to last window/tab (in the list of window handles)
switch_to_next_window()
Switch to next window/tab in the list of window handles. If current window is the last in the list this will circle back from the start.
switch_to_previous_window()
Switch to previous window/tab in the list of window handles. If current window is the first in the list of window handles this will circle back from the top.
switch_to_window_by_index(index)
Switch to window/tab by index. Note: “The order in which the window handles are returned is arbitrary.”
switch_to_window_by_partial_title(partial_title)
Switch to window/tab by partial Title
switch_to_window_by_partial_url(partial_url)
Switch to window/tab by partial URL
switch_to_window_by_title(title)
Switch to window/tab by title
switch_to_window_by_url(url)
Switch to window/tab by title
verify_amount_of_windows(amount)
Verify the amount of open windows/tabs
verify_window_present_by_partial_title(title)
Verify there is a window/tab present by partial title
verify_window_present_by_partial_url(partial_url)
Verify there is a window/tab present by partial URL
verify_window_present_by_title(title)
Verify there is a window/tab present by title
verify_window_present_by_url(url)
Verify there is a window/tab present by URL
wait_for_window_present_by_partial_title(partial_title, timeout=30)
Wait for window/tab present by partial title
wait_for_window_present_by_partial_url(partial_url, timeout=30)
Wait for window/tab present by partial url
wait_for_window_present_by_title(title, timeout=30)
Wait for window/tab present by title
wait_for_window_present_by_url(url, timeout=30)
Wait for window/tab present by url
General Actions
error(message=’’)
Add an error to the test. The test will continue.
fail(message=’’)
Mark the test as failure and stop
get_data()
Return test data.
get_secrets()
Return the secrets object.
get_search_timeout()
Get search timeout.
interactive_mode()
Starts an interactive console at this point of the test. The test should be run with the ‘-i’ flag, otherwise this action will be ignored. See Interactive Mode for more details.
log(message, level=’INFO’)
Log a message. Valid log levels are: DEBUG, INFO, WARNING, ERROR and CRITICAL.
random_float(min=1.0, max=100.0, decimals=None)
Generate a random float between min and max. Decimals is the maximum amount of decimal places the generated float should have.
random_int(min=1, max=100)
Generate a random integer between min and max
random_str(length=10, sample=None, prefix=’’, suffix=’’)
Generate a random string. Sample should be a string or a list of strings/characters to choose from. The default sample is lowercase ascii letters. A few presets can be used:
- ‘LOWERCASE’: lower case ascii letters
- ‘UPPERCASE’: uppercase ascii letters
- ‘DIGITS’: digit characters
- ‘SPECIAL’: Special characters
Example:
random_str(sample=['LOWERCASE', '!@#$%']) -> 'am$y%eg$ug'
prefix: A string to be prepended to the generated string
suffix: A string to be appended to the generated string
set_browser_capability(capability_key, capability_value)
Set a browser capability. This must be called before the browser is started.
set_search_timeout(timeout)
Set the search timeout value (in seconds). Timeout must be either int or float.
set_trace()
Perform a pdb.set_trace(). The test should be run with the ‘-i’ flag, otherwise this action will be ignored. Read more about the Python debugger here.
step(message)
Add a step to the report
store(key, value)
Store a value in data object.
store_secret(key, value)
Store a value in the secrets object.
take_screenshot(message=’’)
Take a screenshot. message will be used for the filename.
timer_start(timer_name=’’)
Start a timer. By default start a timer with empty name. Use actions.timer_stop() to stop the timer. Returns: the current time.
timer_stop(timer_name=’’)
Stop a timer by its name. By default stops a timer with empty name. Returns: the elapsed time.
wait(seconds)
Pause execution for the given amount of seconds. Seconds can be an int or float.
Tests
Tests are functions that begin with ‘test’ and are located in Python modules in the test folder of a project.
To create a test first start a Golem test directory, if you don’t already have one, and add a project to it:
golem-admin createdirectory <directory_name>
cd <directory_name>
golem createproject <project_name>
Then add a test file inside that project:
golem createtest <project_name> <test_name>
A project and a test can also be created using the Web Module:
golem gui
Test Structure
description = ''

tags = []

pages = []

skip = False


def setup(data):
    pass


def test_one(data):
    pass


def test_two(data):
    pass


def teardown(data):
    pass
A test file must implement at least one test function that receives a data object as argument.
Multiple Tests per File
All test functions inside a test file are run in sequence. The data is shared between tests. The browser session is shared as well, unless a test explicitly closes the current open browser.
Test Data
Test data can be defined inside the file or in a separate CSV file. For detailed info about see: Test Data
CSV Data
It should be defined in a CSV file with the same name and in the same folder as the test.
Infile Test Data
A test can have data defined as a list of dictionaries.
data = [
    {
        'url': 'http://url1.com',
        'title': 'title1'
    },
    {
        'url': 'http://url2.com',
        'title': 'title2'
    }
]

def test(data):
    navigate(data.url)
    assert_title(data.title)
Note: when saving a test using the Test Module, if the test_data setting is not ‘infile’, any data stored in the test will be moved to a CSV file.
Skip flag
A flag variable to indicate that this test should be skipped. It should be a boolean or a string to use as skip message. Note: tests will only be skipped when running from a suite.
Tags
A list of tags (strings). Tags can be used to filter tests when running a suite. See Filter Tests by Tags.
Implicit vs Explicit Imports
By default, the test runner imports the golem.actions module and any page module implicitly during the execution. Pages are saved as a list of strings. The GUI test builder complies with this format and generates code like the following:
pages = ['page1']


def test(data):
    navigate('https://...')
    page1.custom_funtion()
This behaviour can be turned off by setting implicit_actions_import and implicit_page_import to false.
Then, the test structure will be:
from golem import actions

from projects.<project_name>.pages import page1


def test(data):
    actions.navigate('https://...')
    page1.custom_funtion()
GUI Test Builder and Imports Statements
The GUI test builder only supports import statements for the golem.actions module and any Python module inside the pages folder; and only when the implicit modes are turned off. Any other import statements will be discarded when saving a test from the GUI test builder.
Pages
A page in Golem is a module that can be imported into a test. It can be used as a Page Object.
Page Elements
A way to store element selectors in a page is by using a tuple. This is the default behavior for the Web Module.
input = ('id', 'myID', 'My Input')
button = ('css', 'button.btn-default', 'My Button')
The third value in the tuple is optional and it is used as a friendly name by the execution report.
Page Functions
A page can have functions and these will be available from the test after importing the page into it. These functions will also be available when using the Web Module as regular actions do.
Example 1:
page1.py
from golem.browser import element

title = ('css', 'h1')

def assert_title(expected_title):
    assert element(title).text == expected_title
test1.py
pages = ['page1']

def test(data):
    navigate('http://...')
    page1.assert_title('My Expected Title')
Example 2:
page2.py
from golem.browser import elements

table_rows = ('css', 'table > tbody > tr')

def assert_row_amount(expected_amount):
    rows = elements(table_rows)
    assert len(rows) == expected_amount, 'Incorrect amount of rows'
test2.py
pages = ['page2']

def test(data):
    navigate('http://...')
    page2.assert_row_amount(5)
Suites
A suite can execute a set of tests with the specified configuration. A suite contains a list of tests, browsers, and environments and the number of processes, and tags. Consider the following example:
full_regression.py
browsers = ['firefox', 'chrome']

environments = []

processes = 2

tags = []

tests = [
    'test1',
    'test2',
    'some_folder.test3',
]
Note
This suite will execute all marked tests, once per each browser, environment and test set
Test Parallelization
The ‘processes = 2’ tells Golem how many tests should be executed at the same time. The default is one (one at a time). How many tests can be parallelized depends on your test infrastructure.
Environments
Environments are defined in the environments.json file inside a project. See Environments.
Test data
A test file can have one of three different types of data sources: CSV, JSON and internal.
CSV Data
The CSV data file must have the same filename as the test file and be located in the same folder. Note that: All CSV values are considered strings. If you need different value types use JSON or internal data.
test_01.csv
name,age
John,23
Marie,32
test_01.py
def test(data):
    print(data.name, data.age)
JSON Data
The JSON data file must have the same filename as the test file and be located in the same folder. Valid JSON data must be an object (dictionary), or an array of objects (list of dictionaries). Invalid data is ignored.
test_02.json
[
   {
      "item_id": 5143,
      "price": 2134.55,
   },
   {
      "item_id": 8429,
      "price": 462.21,
   }
]
test_01.py
def test(data):
    print(data.item_id, data.price)
Internal Data
Internal data must be a variable with name “data” defined inside the test file and of type either dictionary or list of dictionaries.
test_03.py
data = [
    {
        'name': 'Chicken S Rice',
        'price': 100,
        'discount': True
    },
    {
        'customer': 'Paneer Schezwan Rice',
        'price': 110
        'discount': False,
    },
]

def test(data):
    print(data.name, data.price, data.discount)
Repeating the test based on data
When the data is a list (or array) with more than one item, or a CSV table with more than one row, the test will repeat once per each test data set.
Adding Values to Data at Runtime
Values can be added to the data object using the store action.
def test(data):
    store('title', 'My Title')
    assert_title(data.title)
Accesing data during the test
The data object is present in the execution module during the test.
from golem import execution

print(execution.data.my_value)
The data object is shared among all the test functions of a test file:
def setup(data):
    store('title', 'My Title')
    data.username = 'my-username'  # direct assignment also works

def test_one(data):
    assert_title(data.title)
    assert_username(data.username)

def test_two(data):
    assert_title_is_not(data.title)
    assert_username_is_not(data.username)
The get_data action can be used to retrieve the data object:
page1.py
from golem import actions

def function():
    print(actions.get_data().title)
Environments
Environments are defined in the environments.json file inside a project. This file can be used to store environment specific data, such as the URL and the user credentials.
For example:
environments.json
{
    "testing": {
        "url": "http://testing.app",
        "users": {
            "user01": {
                "username": "john"
            },
            "user02": {
                "username": "mark"
            }
        }
    },
    "staging": {
        "url": "http://stage.app",
        "users": {
            "user01": {
                "username": "john"
            },
            "user02": {
                "username": "mark"
            }
        }
    }
}
During the execution of the test, the environment data is stored in data.env:
test1.py
def test(data):
    navigate(data.env.url)
    login(data.env.users.user01.username)
Select the Environments For the Test
There are two ways to define the environment (or environments) for a test or suite:
from the command line:
golem run project_name test_name -e testing
golem run project_name suite_name -e testing staging
from the definition of a suite:
suite1.py
environments = ['testing']
Secrets
Secrets are defined in the secrets.json file inside a project. Secrets can be used to store specific data which you do not want to expose in golem test reports / logging such as passwords, hostnames of database systems and temporary test data needed for text execution
Please note: When using secrets in conjunction with default Golem actions, their values can be exposed in the test reports and logs. Exposure is caused by the fact that most default golem actions log their actions.
secrets.json
{
  "database": {
    "host": "db-server.local",
    "user": "db_consumer",
    "password": "abc",
    "port": 5432,
    "schema": "public"
  },
  "secret_user_1": "Joe"
}
During text execution secrets can be stored and retrieved, see examples below.
- storing and retrieving a secret from a test
def test(data):
    store_secret('password', 'my_password')
    print(get_secrets().password)
- storing and retrieving a secret from a page
from golem import actions
def some_function():
    actions.store_secret('password', 'my_password')
    print(actions.get_secrets().password)
Running tests
Run a single test
A test file can be run using the file path or the test module path. In both cases it should be relative to the tests folder.
golem run project_name test_name
golem run project_name test_name.py
golem run project_name folder.test_name
golem run project_name folder/test_name.py
Run a suite
Similar to a test, a suite can be run using the file path or the test module path. In both cases it should be relative to the suites folder.
golem run project_name suite_name
golem run project_name suite_name.py
golem run project_name folder.suite_name
golem run project_name folder/suite_name.py
Run every test in a directory
To select all the tests in a directory and subdirectories a relative path can be supplied. The path has to be relative to the tests folder.
golem run project_name folder/
Run every test in a project
golem run project_name .
Select Browsers
golem run project suite -b chrome firefox
Every selected test will be run for each of the selected browsers. The browsers can also be defined inside a suite. If no browser is set, the default defined in settings will be used. The valid options for browsers are listed here.
Run Tests in Parallel
To run test files in parallel the number of processes must be set to more than 1. This can be done through the golem run command or by the processes attribute of a suite.
golem run project suite_name -p 3
Select Environments
Select which environments to use for a test execution:
golem run project suite -e internal staging
Filter Tests by Tags
The selected tests for an execution can be filtered by tags.
golem run project suite -t smoke "release 42.11.01"
Multiple tags are always used with and operator. To use a combination of and, or, and not, a tag expression must be used:
golem run project suite -t "smoke and (regression or not 'release 001')"
Report
Default Report
When an execution is run a JSON report is generated in this location:
<golem_dir>/projects/<project_name>/reports/<execution_name>/<timestamp>/report.json
Generate Reports After Execution
These are the available report types:
- html (single html file, screenshots included)
- html-no-images (single html file, without screenshots)
- json
- junit (XML compatible with Jenkins)
Example:
golem run project suite -r junit html html-no-images json
Report Location
The location of the reports can be specified with the –report-folder argument:
golem run project suite -r html --report-folder /the/path/to/the/report
Report Name
By default, the report name is ‘report’ (’report.xml’, ‘report.html’, ‘report-no-images.html’ and ‘report.json’)
The name of the reports can be modified with the –report-name argument:
golem run project suite -r html --report-name report_name
Modify Screenshot Format, Size, and Quality
The size and compression of the screenshots can be modified to reduce the size on disk.
For example:
Given the default settings (PNG image, no resize, no compression), a screenshot was ~149kb.
When these settings were applied:
{
    "screenshots": {
        "format": "jpg",
        "quality": 50,
        "resize": 70
    }
}
Then the same screenshot takes ~35kb.
Experiment to find optimum settings. More info on screenshot formatting here.
Settings
Settings are defined in the settings.json file. They modify certain Golem behaviors. There is a global settings.json file and a project settings.json file. Note: project settings override global settings.
Setting List
search_timeout
Default time to wait looking for an element until it is present. Default is 20 seconds.
wait_displayed
Wait for elements to be present and displayed. Default is False.
screenshot_on_error
Take a screenshot on error by default. Default is True.
screenshot_on_step
Take a screenshot on every step. Default is False.
screenshot_on_end
Take a screenshot after ‘test’ function ends. Default is False.
highlight_elements
Highlight elements on the screen when found. Default is False
wait_hook
Custom wait method to use for every action, that can be specific to each application. It must be defined inside extend.py
default_browser
Define the driver to use unless overriden by the -b/–browsers flag. Default is ‘chrome’. The valid options are listed here.
chromedriver_path
Path to the Chrome driver executable.
edgedriver_path
Path to the Edge driver executable.
geckodriver_path
Path to the Gecko driver executable.
iedriver_path
Path to the Internet Explorer driver driver executable.
operadriver_path
Path to the Opera driver executable.
opera_binary_path
The path to the Opera binary file. Used to fix “Error: cannot find Opera binary” error.
remote_url
The URL to use when connecting to a remote webdriver, for example, when using selenium grid. Default is ‘http://localhost:4444/wd/hub’
remote_browsers
Defines a list of remote browsers with its capabilities, required to run tests with Selenium Grid or another remote device provider. The minimum capabilities required are ‘browserName’, ‘version’ and ‘platform’, read this for more info.
Example: settings.json
{

"remote_browsers": {
        "chrome_60_mac": {
            "browserName": "chrome",
            "version": "60.0",
            "platform": "macOS 10.12"
        },
        "firefox_56_windows": {
            "browserName": "firefox",
            "version": "56.0",
            "platform": "Windows 10"
        }
    }

}
implicit_actions_import
Import golem.actions module implicitly to the tests. Modifies test saving behavior when using the GUI test builder. Default is true.
implicit_page_import
Import pages implicitly to the test from a list of strings. When true, imported pages are saved as a list of strings. When false, import statements are used instead. Default is true.
screenshots
Modify screenshot format, size, and quality before saving to disk.
Requires Pillow to be installed. It must be installed separately: pip install pillow
It should be an object with the following attributes: format, quality, width, height, and resize
- format: “jpg” or “png”. The default is “png”.
- quality: an int in 1..95 range. The default is 75. This only applies to “jpg” files.
- width: defines the width of screenshots. If “height” is not set, this will maintain the aspect ratio.
- height: defines the height of screenshots. If “width” is not set, this will maintain the aspect ratio.
- resize: the percentage to resize screenshots. Must be int or string in the format “55” or “55%”. To resize by percentage do not set width or height.
Example:
{
    "screenshots": {
        "format": "jpg",
        "quality": 50,
        "resize": 70
    }
}
cli_log_level
command line log level. Options are: DEBUG, INFO, WARNING, ERROR, CRITICAL. Default is INFO.
log_all_events
Log all events or just Golem events. Default is true.
start_maximized
Start the browser maximized. Default is true.
Test Framework
Test File
A test file contains one or more tests (functions that start with ‘test’)
Test files also can have the setup and teardown hooks:
Setup
A function that is executed before every test of a test file.
Teardown
A function that is executed after all tests even if there were exceptions or errors.
Example
description = 'the description for my test'

pages = ['login', 'menu', 'releases']

def setup(data):
    navigate(data.env.url)
    login.login(data.env.user1)

def test(data):
    menu.navigate_to('Releases')
    data.store('release_name', 'release_001')
    releases.create_release(data.release_name)
    releases.assert_release_exists(data.release_name)

def teardown(data):
    releases.remove_release(data.release_name)
Test Results
The test can end with one of the following result statuses:
Success: The test run without any errors.
Failure: The test threw an AssertionError.
Possible reasons for a test to end with failure:
Actions that start with ‘assert_’.
actions.assert_title('My App Title')
A call to fail() action.
actions.fail('this is a failure')
A normal Python assert statement.
assert browser.title == 'My App Title', 'this is the incorrect title'
Error:
The test had at least one error. Possible reasons for errors:
Actions that start with ‘verify_’.
An error added manually:
actions.error('my error message')
Code error:
Any exception that is not an AssertionError will mark the test as ‘code error’.
Example:
test1.py
def test(data):
   send_keys('#button', 'there is something missing here'
>golem run project1 test1
17:55:25 INFO Test execution started: test1
17:55:25 ERROR SyntaxError: unexpected EOF while parsing
Traceback (most recent call last):
  File "C:\...\testdir\projects\project1\tests\test1.py"
SyntaxError: unexpected EOF while parsing
17:55:25 INFO Test Result: CODE ERROR
Assertions and Verifications
Soft Assertions
Every action that starts with “verify” is a soft assertion, meaning that the error will be recorded. The test will be marked as ‘error’ at the end, but the test execution will not be stopped.
Hard Assertions
Every action that starts with “assert” is a hard assertion, meaning that it will stop the test execution at that point. The teardown method will still be executed afterward.
Assertion Actions Example
verify_element_present(element):
- It adds an error to the error list
- Logs the error to console and to file
- Takes a screenshot if screenshot_on_error setting is True
- The test is not stopped.
- The test result will be: ‘error’
assert_element_present(element):
- An AssertionError is thrown
- It adds an error to the list
- Logs the error to console and to file
- Takes a screenshot if screenshot_on_error setting is True
- The test is stopped, jumps to teardown function
- The test result will be: ‘failure’
GUI - Web Module
Commands
Start the web module:
golem gui
Specify the port
golem gui -p 8080
Specify the host
golem gui --host 127.0.0.1
Default is localhost. Running it in host=0.0.0.0 will make Golem accessible from outside the computer by using the public IP of the computer running Golem. Use this only if debug mode is turned off or if you trust the users of your network.
If public access to the web module is needed, consider using a production server.
Run in debug mode
golem gui -d
Users
User Permissions
There are five user permissions: superuser, admin, standard, read-only, reports-only. Permissions are defined for each project except superuser that is global. Permission access is documented in the table below.
| Page | Permission | superuser | admin | standard | read-only | reports-only |
|---|---|---|---|---|---|---|
| Suite/Test/Page List | view | ✓ | ✓ | ✓ | ✓ | |
| add | ✓ | ✓ | ✓ | |||
| duplicate | ✓ | ✓ | ✓ | |||
| rename | ✓ | ✓ | ✓ | |||
| run | ✓ | ✓ | ✓ | |||
| delete | ✓ | ✓ | ||||
| Suite/Test/Page Builder | view | ✓ | ✓ | ✓ | ✓ | |
| edit | ✓ | ✓ | ✓ | |||
| run | ✓ | ✓ | ✓ | |||
| Environments | view | ✓ | ✓ | ✓ | ✓ | |
| edit | ✓ | ✓ | ||||
| Project Settings | view | ✓ | ✓ | ✓ | ✓ | |
| edit | ✓ | ✓ | ||||
| Global Settings | view/edit | ✓ | ||||
| User Management | view/edit | ✓ | ||||
| Reports | view | ✓ | ✓ | ✓ | ✓ | ✓ |
| delete | ✓ | ✓ |
Creating Users
Superusers can be created using the createsuperuser command. Non superusers have to be created from the User Management page.
Secret Key
For security purposes, each test directory is generated with a unique secret key stored in the .golem file.
Example .golem file:
[gui]
secret_key = <your_super_secret_key_string>
If the secret key is not provided, a default key will be used (not recommended).
Using a Production Server
The default server (Flask development server) is not suited for production.
The Golem GUI web application can be run with a production WSGI server just like any other Flask application.
As an example, these are the steps to use Waitress:
pip install waitress

waitress-serve --call "golem.gui:create_app"
There are a lot of different options. Here is a complete guide: https://flask.palletsprojects.com/en/2.0.x/deploying/
The CLI
golem-admin
createdirectory
golem-admin createdirectory <name>
Used to generate a new test directory. Name must be a relative or absolute path for the new test directory. Use ‘.’ to use the current directory.
golem
run
The command to run tests or suites from the command line:
golem run <project> <test|suite|directory> [-b|--browsers]
          [-p|--processes] [-e|--environments] [-t|--tags]
          [-i|--interactive] [-r|--report] [--report-folder]
          [--report-name] [-l|--cli-log-level][--timestamp]
-b, --browsers
One or more browsers to use for the tests. If not provided, the browsers defined inside the suite or the default browser defined in settings will be used. The valid options are listed here.
-p, --processes
The number of tests to run in parallel. The default is 1.
-e, --environments
The environments to use for the execution. If not provided, the environments defined inside the suite will be used.
-t, --tags
Filter the tests by tags.
Example, run all tests with tag “smoke”:
golem run project_name . --tags smoke
Or using a tag expression:
golem run project suite --tags "smoke and (regression or not 'release 001')"
-i, --interactive
Run the test in interactive mode. This is required for the interactive_mode and set_trace actions.
See Interactive Mode
-r, --report
Select which reports should be generated at the end of the execution. Options are: junit, html, html-no-images, and json
--report-folder
Absolute path to the generated reports.
The default is /<testdir>/projects/<project>/resports/<suite>/<timestamp>
--report-name
Name of the generated reports. The default is ‘report’
-l, --cli-log-level
command line log level. Options are: DEBUG, INFO, WARNING, ERROR, CRITICAL. Default is INFO.
--timestamp
Used by the execution. Optional. The default is auto-generated with the format: ‘year.month.day.hour.minutes.seconds.milliseconds’
gui
golem gui [--host -p|--port -d|--debug]
Start Golem Web Module (GUI). Default host is 127.0.0.1 (localhost). Use host 0.0.0.0 to make the GUI publicly accessible. Default port is 5000. Debug runs the application in debug mode, default is False. Do not run in debug mode on production machines.
See GUI - Web Module for more info.
createproject
golem createproject <project name>
Creates a new project with the given name. Creates the base files and folders.
createtest
golem createtest <project name> <test name>
Creates a new test inside the given project.
createsuite
golem createsuite <project name> <suite name>
Creates a new suite inside the given project.
createsuperuser
golem createuser [-u|--username -e|email -p|--password -n|--noinput]
Create a new superuser. The command is interactive unless username and password are provided. Email is optional.
webdriver-manager
update
webdriver-manager update -b chrome
To learn more about the Webdriver Manager see: https://github.com/golemhq/webdriver-manager.
Interactive Mode
With Golem the execution of a test can be paused at any point to start an interactive console with all the actions available. This is useful for debugging tests.
interactive_mode Action
To start the interactive console at any point of a test just add the interactive_mode action. Example:
test.py
def test(data):
    navigate('http://wikipedia.org/')
    interactive_mode()
    click(page.button)
    take_screenshot('final screenshot')
When the test reaches the second step, the interactive console is going to start:
 interactive-console
When the interactive console is terminated, the test will resume the execution from that point on.
Note
If the test is not run with the -i flag, the interactive_mode action will be ignored
Quick Interactive Mode
It is possible to start a quick interactive shell by not providing a project and test to the run command:
golem run -i
This will start an interactive console with a clean slate.
>golem run -i
Entering interactive mode
type exit() to stop
type help() for more info
>>> navigate('https://en.wikipedia.org')
12:47:54 INFO Navigate to: 'https://en.wikipedia.org'
>>> send_keys('#searchInput', 'automation')
12:48:58 INFO Write 'automation' in element #searchInput
>>> click('#searchButton')
12:49:18 INFO Click #searchButton
>>> get_browser().title
'Automation - Wikipedia'
>>> assert_title_contains('Automation')
12:49:50 INFO Assert page title contains 'Automation'
Python Debugger
It is possible to add a Python debugger breakpoint (pdb.set_trace()) using the set_trace action. As with the interactive_mode, the test must be run with the -i flag for this action to take effect. More info about pdb here.
Example:
test.py
def test(data):
    navigate('https://en.wikipedia.org')
    set_trace()
>golem run project test -i
12:57:11 INFO Test execution started: test
12:57:11 INFO Browser: chrome
12:57:11 INFO Navigate to: 'https://en.wikipedia.org'
--Return--
> c:\[...]\golem\actions.py(1578)set_trace()->None
-> pdb.set_trace()
(Pdb)
API Reference
Browser Module
Functions to manipulate WebDriver Browser instances.
Location: golem.browser
open_browser(browser_name=None, capabilities=None, remote_url=None, browser_id=None)
When no arguments are provided the browser is selected from the CLI -b|–browsers argument, the suite browsers list, or the default_browser setting.
This can be overridden in two ways:
- a local webdriver instance or
- a remote Selenium Grid driver instance.
To open a local Webdriver instance pass browser_name with a valid value
To open a remote Selenium Grid driver pass a capabilities dictionary and a remote_url. The minimum capabilities required is:
{
    browserName: 'chrome'
    version: ''
    platform: ''
}
More info here: https://github.com/SeleniumHQ/selenium/wiki/DesiredCapabilities
If remote_url is None it will be taken from the remote_url setting.
When opening more than one browser instance per test provide a browser_id to switch between browsers later on
Returns: the opened browser
get_browser()
Returns the active browser. Starts a new one if there is none.
activate_browser(browser_id)
Activate an opened browser. Only needed when the test starts more than one browser instance.
Raises:
- InvalidBrowserIdError: The browser Id does not correspond to an opened browser
Returns: the active browser
Execution Module
This module stores values specific to a test file execution. These values should be read-only, modifying them can cause errors.
Location: golem.execution
Example:
test.py
from golem import execution
from golem.browser import open_browser


def test(data):
    print('Running test:', execution.test_name)
    open_browser()
    execution.browser.navigate('http://...')
    execution.logger.info('log this message')
test_file
Module path of the current test file, relative to the tests folder.
browser
The current active browser object. None if there is no open browser yet.
browser_definition
The browser definition passed to this test.
browsers
A dictionary with all the open browsers.
data
The data object.
secrets
The secrets data object.
description
The description of the test.
settings
The settings passed to this test.
test_dirname
The directory path where the test is located.
test_path
Full path to the test file.
project_name
Name of the project.
project_path
Path to the project directory.
testdir
Golem root directory.
execution_reportdir
Path for the execution report.
testfile_reportdir
Path for the test file report
logger
Test logger object.
tags
The list of tags passed to the execution.
environment
Name of the environment passed to the test. None is no environment was selected.
Values for each test function
test_name
Current test function name.
steps
Steps collected by the current test function.
errors
A list of errors collected by the test function.
test_reportdir
Path for the test function report.
timers
A dictionary with timers, used by the timer_start and timer_stop actions.
WebDriver class
class GolemExtendedDriver()
This class represents a browser. It extends selenium.webdriver.remote.webdriver.WebDriver.
Methods and Properties
Accepts alert.
Args:
- ignore_not_present: ignore NoAlertPresentException
Adds a cookie to your current session.
Args:
- cookie_dict: A dictionary object, with required keys - “name” and “value”; optional keys - “path”, “domain”, “secure”, “expiry”
Usage:
driver.add_cookie({'name': 'foo', 'value': 'bar'})
driver.add_cookie({'name': 'foo', 'value': 'bar', 'path': '/'})
driver.add_cookie({'name': 'foo', 'value': 'bar', 'path': '/', 'secure': True})
Returns whether an alert is present
Returns a ApplicationCache Object to interact with the browser app cache
Check an element (checkbox or radiobutton). If element is already checked this is ignored.
Args:
- element: an element tuple, a CSS string or a WebElement object
Close window/tab by index. Note: “The order in which the window handles are returned is arbitrary.”
Args:
- index: index of the window to close from window_handles
Close window/tab by partial title
Close window/tab by partial url
Close window/tab by title
Close window/tab by URL
Close a window/tab by handle and switch back to current handle. If current handle is the same as close_handle, try to switch to the first available window/tab.
Creates a web element with the specified element_id.
Returns the handle of the current window.
Usage:
driver.current_window_handle
Delete all cookies in the scope of the session.
Usage:
driver.delete_all_cookies()
Deletes a single cookie with the given name.
Usage:
driver.delete_cookie(‘my_cookie’)
returns the drivers current desired capabilities being used
Dismiss alert.
Args:
- ignore_not_present: ignore NoAlertPresentException
If element is present, return the element. If element is not present return False
Args:
- element: an element tuple, a CSS string or a WebElement object
Sends a command to be executed by a command.CommandExecutor.
Args:
- driver_command: The name of the command to execute as a string.
- params: A dictionary of named parameters to send with the command.
Returns:
The command’s JSON response loaded into a dictionary object.
Asynchronously Executes JavaScript in the current window/frame.
Args:
- script: The JavaScript to execute.
- args: Any applicable arguments for your JavaScript.
Usage:
script = ("var callback = arguments[arguments.length - 1];"
          "window.setTimeout(function(){ callback('timeout') }, 3000);")
driver.execute_async_script(script)
Synchronously Executes JavaScript in the current window/frame.
Args:
- script: The JavaScript to execute.
- args: Any applicable arguments for your JavaScript.
Usage:
driver.execute_script(‘return document.title;’)
Overrides the current file detector (if necessary) in limited context. Ensures the original file detector is set afterwards.
Example:
with webdriver.file_detector_context(UselessFileDetector):
someinput.send_keys(‘/etc/hosts’)
Args:
- file_detector_class - Class of the desired file detector. If the class is different from the current file_detector, then the class is instantiated with args and kwargs and used as a file detector during the duration of the context manager.
- args - Optional arguments that get passed to the file detector class during instantiation.
- kwargs - Keyword arguments, passed the same way as args.
Find a WebElement
Search criteria:
- The first argument must be: an element tuple, a CSS string, an XPath string, or a WebElement object.
- Keyword search criteria: id, name, link_text, partial_link_text, css, xpath, tag_name.
- Only one search criteria should be provided.
Other args:
- timeout: timeout (in seconds) to wait for element to be present. by default it uses the search_timeout setting value
- wait_displayed: wait for element to be displayed (visible). By default uses the wait_displayed setting value
- highlight: highlights element on the page when found
Usage:
driver.find('div#someId > input.class')
driver.find(('id', 'someId'))
driver.find(id='someId')
driver.find(xpath='//div/input', timeout=5, wait_displayed=True)
Returns:
A golem.webdriver.extended_webelement.ExtendedRemoteWebElement
Described in more detail here.
Find all WebElements that match the search criteria.
Search criteria:
- The first argument must be: an element tuple, a CSS string, or an XPath string.
- Keyword search criteria: id, name, link_text, partial_link_text, css, xpath, tag_name
- Only one search criteria should be provided.
Usage:
driver.find_all('div#someId > span.class')
driver.find(('tag_name', 'input'))
driver.find(xpath='//div/input')
Returns a list of ExtendedRemoteWebElement
Described in more detail here.
Finds an element by css selector.
Use find instead.
Finds an element by a partial match of its link text.
Use find instead.
Finds elements by css selector.
Use find_all instead.
Finds elements by a partial match of their link text.
Use find_all instead.
Invokes the window manager-specific ‘full screen’ operation
Loads a web page in the current browser session.
Get a single cookie by name. Returns the cookie if found, None if not.
Usage:
driver.get_cookie(‘my_cookie’)
Returns a set of dictionaries, corresponding to cookies visible in the current session.
Usage:
driver.get_cookies()
Gets the log for a given log type
Args:
- log_type: type of log that which will be returned
Usage:
driver.get_log(‘browser’) driver.get_log(‘driver’) driver.get_log(‘client’) driver.get_log(‘server’)
Gets the screenshot of the current window as a base64 encoded string which is useful in embedded images in HTML.
Usage:
driver.get_screenshot_as_base64()
Saves a screenshot of the current window to a PNG image file. Returns False if there is any IOError, else returns True. Use full paths in your filename.
Args:
- filename: The full path you wish to save your screenshot to. This should end with a .png extension.
Usage:
driver.get_screenshot_as_file(‘/Screenshots/foo.png’)
Gets the screenshot of the current window as a binary data.
Usage:
driver.get_screenshot_as_png()
Get the index of the current window/tab
Gets the x,y position of the current window.
Usage: driver.get_window_position()
Gets the x, y coordinates of the window as well as height and width of the current window.
Usage: driver.get_window_rect()
Gets the width and height of the current window.
Usage: driver.get_window_size()
Return a list of the titles of all open windows/tabs
Return a list of the URLs of all open windows/tabs
Sets a sticky timeout to implicitly wait for an element to be found, or a command to complete. This method only needs to be called one time per session. To set the timeout for calls to execute_async_script, see set_script_timeout.
Args:
- time_to_wait: Amount of time to wait (in seconds)
Usage:
driver.implicitly_wait(30)
Use search_timeout setting instead.
Maximizes the current window that webdriver is using
Invokes the window manager-specific ‘minimize’ operation
Returns the name of the underlying browser for this instance.
Gets the current orientation of the device
Gets the source of the current page.
Quits the driver and closes every associated window.
Refreshes the current page.
Saves a screenshot of the current window to a PNG image file. Returns False if there is any IOError, else returns True. Use full paths in your filename.
Args:
- filename: The full path you wish to save your screenshot to. This should end with a .png extension.
Usage:
driver.save_screenshot(‘/Screenshots/foo.png’)
Set the amount of time to wait for a page load to complete before throwing an error.
Args:
- time_to_wait: The amount of time to wait
Usage:
driver.set_page_load_timeout(30)
Set the amount of time that the script should wait during an execute_async_script call before throwing an error.
Args: *time_to_wait: The amount of time to wait (in seconds)
Usage:
driver.set_script_timeout(30)
Sets the x,y position of the current window. (window.moveTo)
Args:
- x: the x-coordinate in pixels to set the window position
- y: the y-coordinate in pixels to set the window position
Usage:
driver.set_window_position(0,0)
Sets the x, y coordinates of the window as well as height and width of the current window.
Usage:
driver.set_window_rect(x=10, y=10)
driver.set_window_rect(width=100, height=200)
driver.set_window_rect(x=10, y=10, width=100, height=200)
Sets the width and height of the current window. (window.resizeTo)
Args: *width: the width in pixels to set the window to *height: the height in pixels to set the window to
Usage:
driver.set_window_size(800,600)
Called before starting a new session. This method may be overridden to define custom startup behavior.
Creates a new session with the desired capabilities.
Args:
- browser_name - The name of the browser to request.
- version - Which browser version to request.
- platform - Which platform to request the browser on.
- javascript_enabled - Whether the new session should support JavaScript.
- browser_profile - A selenium.webdriver.firefox.firefox_profile.FirefoxProfile object. Only used if Firefox is requested.
Called after executing a quit command. This method may be overridden to define custom shutdown behavior.
Returns:
SwitchTo: an object containing all options to switch focus into
Usage:
element = driver.switch_to.active_element
alert = driver.switch_to.alert
driver.switch_to.default_content()
driver.switch_to.frame('frame_name')
driver.switch_to.frame(1)
driver.switch_to.frame(driver.find_elements_by_tag_name('iframe')[0])
driver.switch_to.parent_frame()
driver.switch_to.window('main')
Deprecated use driver.switch_to.active_element
Deprecated use driver.switch_to.alert
Deprecated use driver.switch_to.default_content
Switch to first window/tab
Deprecated use driver.switch_to.frame
Switch to last window/tab
Switch to next window/tab in the list of window handles. If current window is the last in the list this will circle back from the start.
Switch to previous window/tab in the list of window handles. If current window is the first in the list this will circle back from the top.
Deprecated use driver.switch_to.window
Switch to window/tab by index. Note: “The order in which the window handles are returned is arbitrary.”
Switch to window/tab by partial title
Switch to window/tab by partial URL
Switch to window/tab by title
Switch to window/tab by URL
Uncheck a checkbox element. If element is already unchecked this is ignored.
Args
- element: an element tuple, a CSS string or a WebElement object
Wait for an alert to be present
Args:
- timeout: time to wait (in seconds)
Wait for element to be present and displayed
Args:
- element: an element tuple, a CSS string or a WebElement object
- timeout: time to wait (in seconds)
Wait for element to be enabled
Args:
- element: an element tuple, a CSS string or a WebElement object
- timeout: time to wait (in seconds)
Wait for element to have attribute
Args:
- element: an element tuple, a CSS string or a WebElement object
- attribute: attribute name
- timeout: time to wait (in seconds)
Usage:
driver.wait_for_element_has_attribute(’#someId’, ‘onclick’, 5)
Wait for element to not have attribute
Args:
- element: an element tuple, a CSS string or a WebElement object
- attribute: attribute name
- timeout: time to wait (in seconds)
Usage: driver.wait_for_element_has_not_attribute(’#someId’, ‘onclick’, 5)
Wait for element to be not displayed. When element is not displayed this is ignored. When element is not present this will raise ElementNotFound.
Args:
- element: an element tuple, a CSS string or a WebElement object
- timeout: time to wait (in seconds)
Wait for element to be not enabled
Args:
- element: an element tuple, a CSS string or a WebElement object
- timeout: time to wait (in seconds)
Wait for element not present in the DOM
Args:
- element: an element tuple, a CSS string or a WebElement object
- timeout: time to wait (in seconds)
Wait for element present in the DOM
Args:
- element: an element tuple, a CSS string or a WebElement object
- timeout: time to wait (in seconds)
Wait for element text to match given text
Args:
- element: an element tuple, a CSS string or a WebElement object
- text: expected element text to be
- timeout: time to wait (in seconds)
Wait for element to contain text
Args:
- element: an element tuple, a CSS string or a WebElement object
- text: expected element to be contained by element
- timeout: time to wait (in seconds)
Wait for element text to not match given text
Args:
- element: an element tuple, a CSS string or a WebElement object
- text: expected text to not be element’s text
- timeout: time to wait (in seconds)
Wait for element to not contain text
Args:
- element: an element tuple, a CSS string or a WebElement object
- text: expected text to not be contained in element
- timeout: time to wait (in seconds)
Wait for page to contains text
Args:
- text: text to be contained in page source
- timeout: time to wait (in seconds)
Wait for page to not contain text
Args:
- text: text to not be contained in page source
- timeout: time to wait (in seconds)
Wait for page title to be the given value
Args:
- title: expected title
- timeout: time to wait (in seconds)
Wait for page title to contain partial_title
Args:
- partial_title: expected partial title
- timeout: time to wait (in seconds)
Wait for page title to not be the given value
Args:
- title: not expected title
- timeout: time to wait (in seconds)
Wait for page title to not contain partial_title
Args:
- partial_title: not expected partial title
- timeout: time to wait (in seconds)
Wait for window/tab present by partial title
Wait for window/tab present by partial url
Wait for window/tab present by title
Wait for window/tab present by url
Returns the handles of all windows within the current session.
Usage: driver.window_handles
WebElement class
class ExtendedWebElement()
This class represents a web element. It extends selenium.webdriver.remote.webelement.WebElement.
Methods and Properties
Check element if element is checkbox or radiobutton. If element is already checked, this is ignored.
Clears the text if it’s a text entry element.
Clicks the element.
Double click the element
Find a WebElement
Search criteria:
- The first argument must be: an element tuple, a CSS string, an XPath string, or a WebElement object.
- Keyword search criteria: id, name, link_text, partial_link_text, css, xpath, tag_name.
- Only one search criteria should be provided.
Other args:
- timeout: timeout (in seconds) to wait for element to be present. By default it uses the search_timeout setting value.
- wait_displayed: wait for element to be displayed (visible). By default uses the wait_displayed setting value.
- highlight: highlights element on the page when found
Usage:
element.find('div#someId > input.class')
element.find(('id', 'someId'))
element.find(id='someId')
element.find(xpath='//div/input', timeout=5, wait_displayed=True)
Returns: a golem.webdriver.extended_webelement.ExtendedRemoteWebElement
Find all WebElements that match the search criteria.
Search criteria:
- The first argument must be: an element tuple, a CSS string, or an XPath string.
- Keyword search criteria: id, name, link_text, partial_link_text, css, xpath, tag_name.
- Only one search criteria should be provided.
Usage:
element.find_all('div#someId > span.class')
element.find(('tag_name', 'input'))
element.find(xpath='//div/input')
Returns: a list of ExtendedRemoteWebElement
Finds element within this element’s children by class name.
Use find instead.
Finds element within this element’s children by CSS selector.
Use find instead.
Finds element within this element’s children by ID.
Use find instead.
Finds element within this element’s children by visible link text.
Use find instead.
Finds element within this element’s children by name.
Use find instead.
Finds element within this element’s children by partially visible link text.
Use find instead.
Finds element within this element’s children by tag name.
Use find instead.
Finds a list of elements within this element’s children by CSS selector.
Use find_all instead.
Finds a list of elements within this element’s children by ID. Will return a list of webelements if found, or an empty list if not.
Use find_all instead.
Finds a list of elements within this element’s children by visible link text.
Use find_all instead.
Finds a list of elements within this element’s children by name.
Use find_all instead.
Finds a list of elements within this element’s children by link text.
Use find_all instead.
Finds a list of elements within this element’s children by tag name.
Use find_all instead.
Finds elements within the element by xpath.
Use find_all instead.
Give focus to element
Gets the given attribute or property of the element.
This method will first try to return the value of a property with the given name. If a property with that name doesn’t exist, it returns the value of the attribute with the same name. If there’s no attribute with that name, None is returned.
Values which are considered truthy, that is equals “true” or “false”, are returned as booleans. All other non-None values are returned as strings. For attributes or properties which do not exist, None is returned.
Args:
- name - Name of the attribute/property to retrieve.
Example:
# Check if the "active" CSS class is applied to an element.
is_active = "active" in target_element.get_attribute("class")
Gets the given property of the element.
Args:
- name - Name of the property to retrieve.
Example:
text_length = target_element.get_property("text_length")
Returns whether element has attribute
Returns whether element has focus
Internal ID used by selenium.
This is mainly for internal use. Simple use cases such as checking if 2 webelements refer to the same element, can be done using ==:
if element1 == element2:
    print("These 2 are equal")
Element innerHTML attribute
Whether the element is visible to a user.
Returns whether the element is enabled.
Returns whether the element is selected.
Can be used to check if a checkbox or radio button is selected.
Click element using Javascript
The location of the element in the renderable canvas.
THIS PROPERTY MAY CHANGE WITHOUT WARNING. Use this to discover where on the screen an element is so that we can click it. This method should cause the element to be scrolled into view.
Returns the top lefthand corner location on the screen, or None if the element is not visible.
Mouse over element
Element outerHTML attribute
Internal reference to the WebDriver instance this element was found from.
Press a key on element
Usage:
element.press_key('ENTER')
element.press_key('TAB')
element.press_key('LEFT')
A dictionary with the size and location of the element.
Saves a screenshot of the current element to a PNG image file. Returns False if there is any IOError, else returns True. Use full paths in your filename.
Args:
- filename: The full path you wish to save your screenshot to. This should end with a .png extension.
Usage: element.screenshot(‘/Screenshots/foo.png’)
Gets the screenshot of the current element as a base64 encoded string.
Usage: img_b64 = element.screenshot_as_base64
Gets the screenshot of the current element as a binary data.
Usage: element_png = element.screenshot_as_png
Return a Select object
Simulates typing into the element.
Args:
- value - A string for typing, or setting form fields. For setting file inputs, this could be a local file path. Use this to send simple key events or to fill out form fields:
form_textfield = driver.find_element_by_name('username')
form_textfield.send_keys("admin")
This can also be used to set file inputs.
file_input = driver.find_element_by_name('profilePic')
file_input.send_keys("path/to/profilepic.gif")
# Generally it's better to wrap the file path in one of the methods
# in os.path to return the actual path to support cross OS testing.
# file_input.send_keys(os.path.abspath("path/to/profilepic.gif"))
Send keys to element one by one with a delay between keys.
Args:
- value: a string to type
- delay: time between keys (in seconds)
Raises:
- ValueError: if delay is not a positive int or float
The size of the element.
Submits a form.
This element’s tagName property.
The text of the element.
Uncheck element if element is checkbox. If element is already unchecked, this is ignored.
The value attribute of element
The value of a CSS property.
Wait for element to have attribute
Returns: The element
Wait for element to not have attribute
Returns: The element
Wait for element to contain given text
Returns: The element
Wait fo element text to not match given text
Returns: The element
Wait for element text to not contain text
Returns: The element
Golem Expected Conditions
Some extra expected conditions. Located at golem.webdriver.golem_expected_conditions.
element_to_be_enabled(element)
An Expectation for checking an element is enabled
text_to_be_present_in_page(text)
An Expectation for checking page contains text
element_text_to_be(element, text)
An expectation for checking the given text matches element text
element_text_to_contain(element, text)
An expectation for checking element contains the given text
element_to_have_attribute(element, attribute)
An expectation for checking element has attribute
window_present_by_partial_title(partial_title)
An expectation for checking a window is present by partial title
window_present_by_partial_url(partial_url)
An expectation for checking a window is present by partial url
window_present_by_title(title)
An expectation for checking a window is present by title
window_present_by_url(url)
An expectation for checking a window is present by url
Guides
Running Tests with Jenkins
In this guide let’s see how Golem tests can be run in jenkins.
Pre-requisites
- Jenkins is installed.
- Python 3.6+ is installed in the Jenkins machine.
- A Golem directory with tests is stored in a git repository.
Steps
In Jenkins go to Dashboard > Manage Jenkins > Global Tool Configuration
In Python > Python installations section add a Python version with the path to the executable:
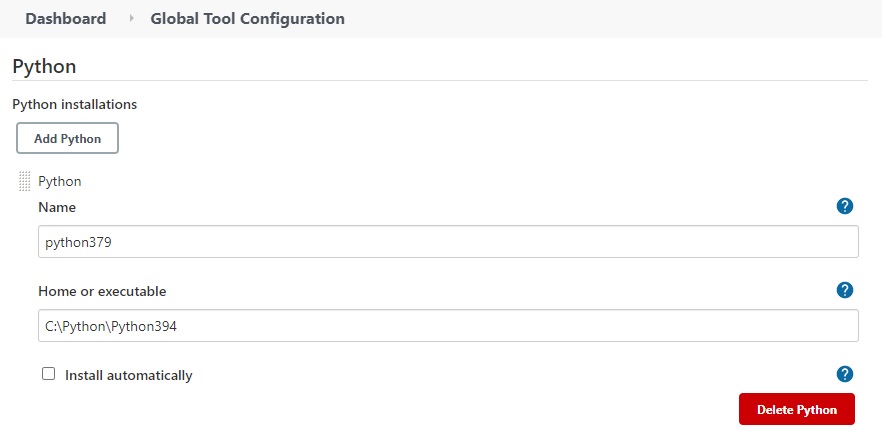
We will be using ShiningPanda to manage the virtual environments in the Jenkins job: https://plugins.jenkins.io/shiningpanda/.
In Jenkins go to Dashboard > Manage Jenkins > Manage Plugins. Install the ShiningPanda plugin and restart Jenkins.
Create a new Jenkins job of type “Freestyle project”
Define the location of the tests in the Source Code Management section:

Add a build step of type “Virtualenv Builder”:
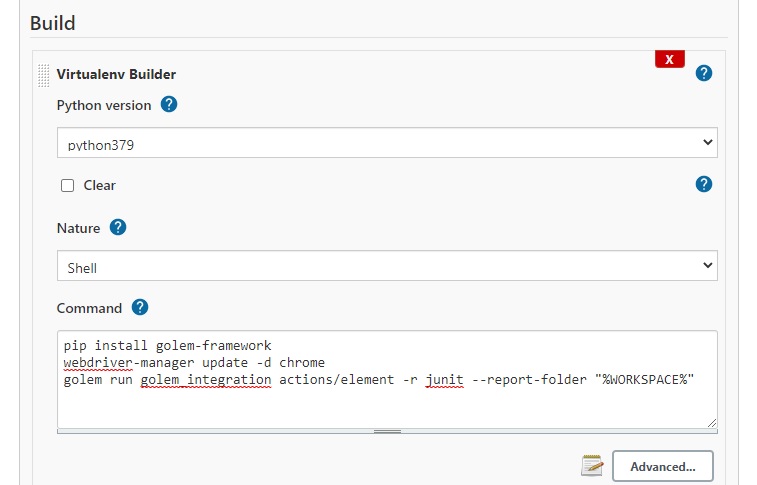
Add a post-build action that collects the generated JUnit XML report:
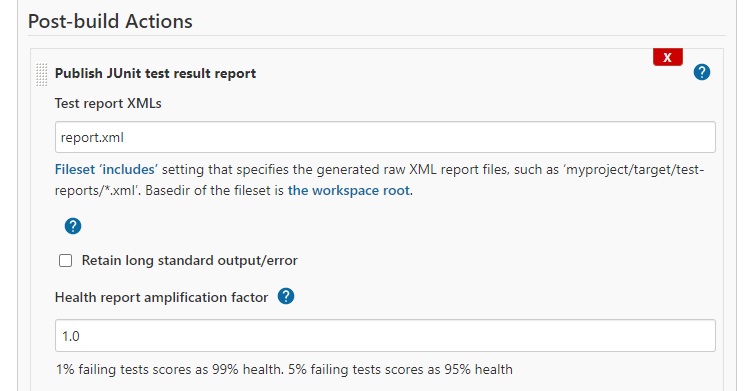
Run!
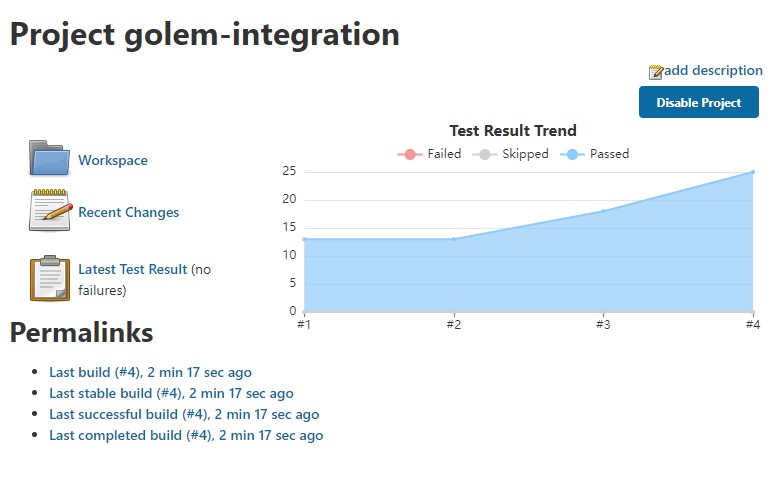
Using Multiple Browsers Sessions
Sometimes a test requires two or more different browser sessions opened at the same time.
A browser is opened by default when using an action that needs a browser. To open a browser explicitly use the open_browser action or golem.browser.open_browser().
Open Multiple Browsers
To open a second browser use open_browser again and pass an id to identify it. The first browser has ‘main’ as its id by default.
The list of opened browsers is stored in golem.execution.browsers.
To use a browser when there is more than one, it has to be activated first:
open_browser()
open_browser('second')
activate_browser('second')
As an example, testing a chat application with two concurrent users:
def test(data):
    navigate('https://app-url.com/')  # browser opened with id='main'
    open_browser('second browser')  # second browser opened
    navigate('https://app-url.com/')
    activate_browser('main')
    send_chat_message('hey there!')
    activate_browser('second browser')
    assert_message_received('hey there!')
Generate a Standalone Executable
Using PyInstaller
A Golem standalone executable without any dependencies (including Python) can be generated using PyInstaller.
Note: the executable must be generated in the same platform that it will be used (e.g.: Windows 10 64 with Python 3.7)
Steps
Create an empty virtualenv (having the required packages only reduces the final executable size):
virtualenv env
Clone the repo and install:
git clone https://github.com/golemhq/golem.git
cd golem
pip install .
Install PyInstaller
pip install pyinstaller
Install python3-dev if needed (Linux)
apt-get install python3-dev
Generate the executable
Linux:
pyinstaller golem/bin/golem_standalone.py --onefile -n golem --add-data "golem/gui/templates:golem/gui/templates" --add-data "golem/gui/static:golem/gui/static"
Windows:
pyinstaller golem\bin\golem_standalone.py --onefile -n golem --add-data "golem\gui\templates;golem\gui\templates" --add-data "golem\gui\static;golem\gui\static"
Where:
--onefile generates a single file instead of a folder
-n golem is the name of the executable
--add-data includes the templates and static files required by the GUI
The executable is generated in the dist folder.
How to Use the Standalone Executable
Put the executable in your path.
The executable includes the golem, golem-admin, and webdriver-manager interfaces.
Usage:
golem golem-admin createdirectory .
golem webdriver-manager update
golem gui
golem run project test